arpypat
Senior Member
I'm gonna guess strut bar and TIP?Haven't done much lately due to covid outbreak....but received these packages today.

OP
OP
Thusee
Senior Member
- First Name
- Thusee
- Joined
- Jul 20, 2018
- Threads
- 1
- Messages
- 521
- Reaction score
- 1,148
- Location
- Markham
- Vehicle(s)
- 2018 civic si sedan
- Vehicle Showcase
- 1
- Thread starter
- #94
Finally got the @Vincent@27WON Turbo Inlet Pipe 01-011 installed! Took a few hours since I wasn't rushing it and did a few other things in between. Overall the install was pretty straight forward and the instructions on the site was a great help.
The install itself isn't that difficult, basic tools is enough and their instructions as always is a great help.... First impression the overall car felt smoother throughout the Power band. Unfortunately my clutch is slipping in every gear due to the added power with everything I have installed can't wait to get the type r retro installed soon.
My butt dyno is happy lol, once clutch and race maf go in it will be time for a full on custom tune. Definitely a must have and looks beautiful!
Used a red touch up pen from my car to add a little personal touch to the 27WON logo just to have it stand out!
PS: Just had to admire the 27won W1 turbo wrapped in the PTP Blanket.....
Last edited:
OP
OP
Thusee
Senior Member
- First Name
- Thusee
- Joined
- Jul 20, 2018
- Threads
- 1
- Messages
- 521
- Reaction score
- 1,148
- Location
- Markham
- Vehicle(s)
- 2018 civic si sedan
- Vehicle Showcase
- 1
- Thread starter
- #95
These are one of the few pre production front strut bars from 27WON Performance. I was fortunate enough to get one from them as a Beta tester.
I have always wanted one but all the good ones I found as a solid bar covered the brake reservoir. So when 27won went into the design phase I noticed the bar goes around the reservoir so having access to that is a great benefit for anyone that tracks and need to bleed brakes frequently. I will be putting it to the test at the track when the time comes but I'm very happy with it.
As you can see I have the Tein EDFC installed for the damper adjustment and no issues with clearance.
The finish and install is very easy takes like 2 minutes to install with the right tools.
@10thgenclub #27won #10thgencivicsi #honda #hondacivicsi #turbo #teinusa
Last edited:
OP
OP
Thusee
Senior Member
- First Name
- Thusee
- Joined
- Jul 20, 2018
- Threads
- 1
- Messages
- 521
- Reaction score
- 1,148
- Location
- Markham
- Vehicle(s)
- 2018 civic si sedan
- Vehicle Showcase
- 1
- Thread starter
- #97
me too, but before that going to do the clutch and waiting for 27won maf housing. Then I will do a tune and see what it looks like.Looks great. Looking forward to your tune results
OP
OP
Thusee
Senior Member
- First Name
- Thusee
- Joined
- Jul 20, 2018
- Threads
- 1
- Messages
- 521
- Reaction score
- 1,148
- Location
- Markham
- Vehicle(s)
- 2018 civic si sedan
- Vehicle Showcase
- 1
- Thread starter
- #99
haha, mines still unfinished so eagerly waiting for clutch to go in, finalize suspension work and couple other minor things..........before i can fully enjoy it.10/10ths build, leaves mine feeling unfinished LOL
OP
OP
Thusee
Senior Member
- First Name
- Thusee
- Joined
- Jul 20, 2018
- Threads
- 1
- Messages
- 521
- Reaction score
- 1,148
- Location
- Markham
- Vehicle(s)
- 2018 civic si sedan
- Vehicle Showcase
- 1
- Thread starter
- #100
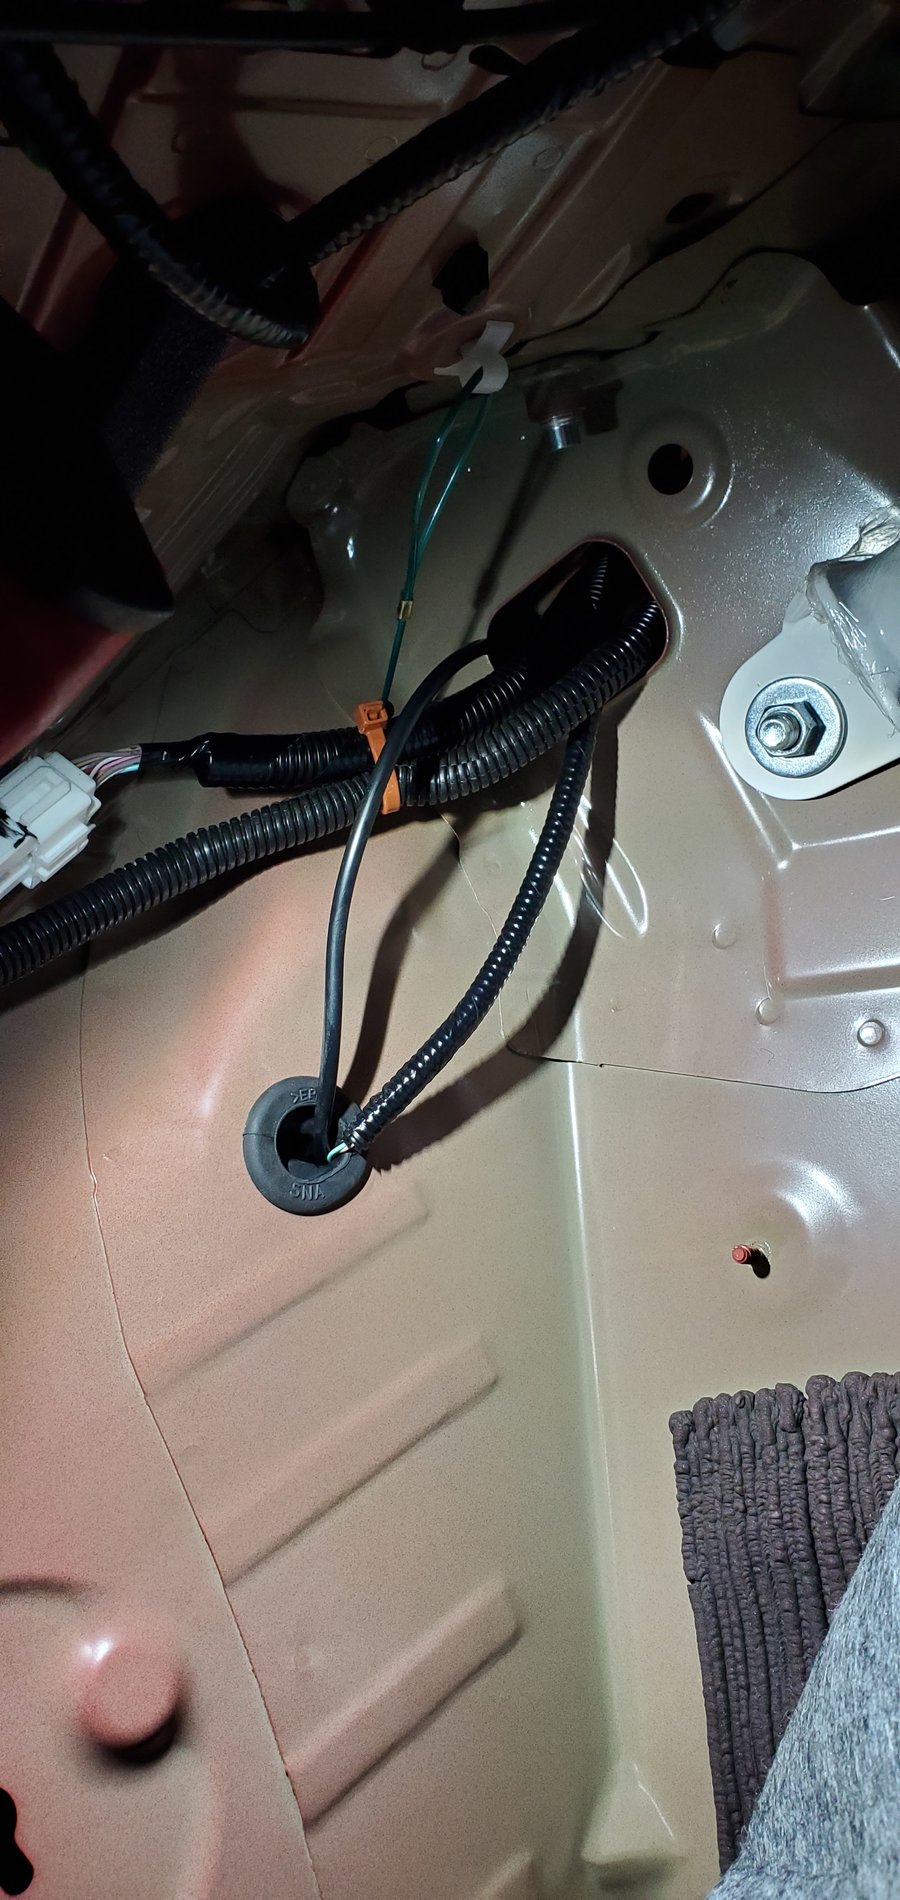
Finally decided to complete the wiring for the Suma Performance Wide Angle Mirrors (heated + signal) from www.unity-performance.com aka @CanadiaegeanBlue
The hardest part was removing the mirror caps and fishing the wire through. This can be done on car but I took the assembly off. The wires that are provided will reach the front lights.
If you have factory LED head lights then the signal wire is on the main harness that plugs in.
On the driver side (left side) the wire blue
On passenger side (right side) the wire is green
The black wire that is provided in the kit should be tapped onto the green and blue wire respective to each side and the other part of the black wire can be grounded to a bolt on both sides.
Shoutout to @Califoranas for making a youtube video which helped as well, only difference being the wiring as his has halogen headlights.


The white car is @Califoranas on IG great guide.
And here is a walk around of my car with the finished install.
The hardest part was removing the mirror caps and fishing the wire through. This can be done on car but I took the assembly off. The wires that are provided will reach the front lights.
If you have factory LED head lights then the signal wire is on the main harness that plugs in.
On the driver side (left side) the wire blue
On passenger side (right side) the wire is green
The black wire that is provided in the kit should be tapped onto the green and blue wire respective to each side and the other part of the black wire can be grounded to a bolt on both sides.
Shoutout to @Califoranas for making a youtube video which helped as well, only difference being the wiring as his has halogen headlights.
The white car is @Califoranas on IG great guide.
And here is a walk around of my car with the finished install.
Last edited:
OP
OP
Thusee
Senior Member
- First Name
- Thusee
- Joined
- Jul 20, 2018
- Threads
- 1
- Messages
- 521
- Reaction score
- 1,148
- Location
- Markham
- Vehicle(s)
- 2018 civic si sedan
- Vehicle Showcase
- 1
- Thread starter
- #101
Suspension update:
TEIN FLEX Z + EDFC CONTROLLER
With the Si I actually really love the Active Dampers, being able to make the suspension stiff or soft with a press of a button and wanted to retain it. This is not new to me and knew the only company that is capable of this is TEIN.
With my previous build (2000 Prelude) I had this setup on that car. Tein Street Advance with EDFC so depending on the road conditions I can adjust the dampers from inside the car.
Example:
Uneven Pavement - ideal suspension setting would be soft
- Putting the dampers to SOFT will allow the shocks to take the road bumps and making the ride comfortable and not bouncing around.
Even Pavement - ideal suspension setting medium to full stiff
- Putting the dampers to MEDIUM to HARD will allow the car to feel more planted with less "floatyness" and improves handling.
For the guys/girls:
If your "non car people (GF/Family/BF)" ask, "Why is your car so bouncy," say "Hold on"
Push a button and make it soft and everyone is happy.
What this system does is incorporate a motor and external controller (both sold seperately) onto the shocks. You remove the damping knob and install the motor setup. This motor controls the damping with what you input to the controller.
So onto the update:
Part Numbers:
Si Coil Overs: VSHL6-CUAS4
Controller: EDK04-P9669 (EDFC2)
Motor Set: EKD05-M12120 (This motor number is VERY important you get the correct one and not the (EKD05-M12140)
Motor Extension: EKD08-P8514-12 (Will explain down below)
Here is the Motor and Controller


I wanted to keep the controller in a spot that is easily accessible/within reach. I didn't want to stick it just anywhere but wanted to integrate it into the interior and make it look somewhat OEM. Checked this spot, removed the side panel and checked behind it and thought this spot would be perfect. Took me a few days to cut/trim/perfect the piece since I only get one chance at it.


Installing the motors on the rear - Remove the top mounting hat, using the supplied tool remove the damping knob, using the right size allen key (can't think of size off the top of my head but i think 3mm) and pull out the allen key bolt that is inside the shaft. Apply some grease and reinsert it flush. Then reinstall the top hat without the adjusting knob. Tighten it down, and then apply some of the green locktight and start screwing down the motor.
As you tighten it you will get some restriction when that happens take a small flat screwdriver and turn the top of the motor to the right like 2 full turns, that will rotate the allen bolt down the middle shaft and then you continue tightening the motor down. As it gets tight again repeat the process of turning the top piece 2 turns. Keep going until motor is firmly down and you can go all the way up and down with the flat screw driver. Once done put the rubber boot over the motor and run the wire out.


The controller has 2 sets of wires, one set for the front shocks and one set for the rear shocks. The front you can run through the grommet near the steering coloumn which is not a problem. However the rear there is NO access to the passenger side wheel well to run a wire through. When i looked at the DRIVER side there was the harness going out through a grommet to the fuel door. So I used that access. I had a few rubber gromets laying around similar to the one on the driver side so I drilled a hole, primered it and ran the wire out that way so it is even on both sides.


Front coil installed


Front motor install:
So I mentioned earlier on the parts list TEIN has 2 sets of motors EDK05-M12120 and EDK05-M12140
The difference is M12120 = 4x M12 fitting size motors, and the M12140 = 2x M12 and 2x M14 size motors.
I initially got the M12140 kit not knowing it was the incorrect kit at the time because everything mounted correctly. Rear coils used M12 size motors and no problem. Fronts Mounted with M14 Motors no problem. Thought I was done so hooked up all the wiring and drove it home, everything worked great until the controller started throwing an ERROR code with the front harness.
Immediately pulled over and inspected and found the wiring had twisted around the motor/shock shaft at the top and the connector popped off the harness. So talking with Tein we found that I had the incorrect motor set.
Funny thing one of my friends had ordered the same setup for his EVO and he ended up receiving the INCORRECT motors! He needed the M12140 which I had and I needed the M12120 which he had.
So I took 2 of his M12 motors and gave him my 2 M14 motors. The extension kit converts the M12 to M14 which mounts to the top of the coil so the Motor gets moved aside. This will allow the shaft to rotate and won't cause the Motor/Harness to bind!
So install is now complete and all working how it should! Also, no ADS light due to the ADS Cancellors which come standard with the coils and don't have to buy it separately!
Also the @Vincent@27WON the strut bar is a perfect place to mount the motors

Any questions feel free to ask! I'll gladly answer to my best ability.
PS: The Damping controller is UNIVERSAL so even non Si vehicles can get full damping adjustment
TEIN FLEX Z + EDFC CONTROLLER
With the Si I actually really love the Active Dampers, being able to make the suspension stiff or soft with a press of a button and wanted to retain it. This is not new to me and knew the only company that is capable of this is TEIN.
With my previous build (2000 Prelude) I had this setup on that car. Tein Street Advance with EDFC so depending on the road conditions I can adjust the dampers from inside the car.
Example:
Uneven Pavement - ideal suspension setting would be soft
- Putting the dampers to SOFT will allow the shocks to take the road bumps and making the ride comfortable and not bouncing around.
Even Pavement - ideal suspension setting medium to full stiff
- Putting the dampers to MEDIUM to HARD will allow the car to feel more planted with less "floatyness" and improves handling.
For the guys/girls:
If your "non car people (GF/Family/BF)" ask, "Why is your car so bouncy," say "Hold on"
Push a button and make it soft and everyone is happy.
What this system does is incorporate a motor and external controller (both sold seperately) onto the shocks. You remove the damping knob and install the motor setup. This motor controls the damping with what you input to the controller.
So onto the update:
Part Numbers:
Si Coil Overs: VSHL6-CUAS4
Controller: EDK04-P9669 (EDFC2)
Motor Set: EKD05-M12120 (This motor number is VERY important you get the correct one and not the (EKD05-M12140)
Motor Extension: EKD08-P8514-12 (Will explain down below)
Here is the Motor and Controller
I wanted to keep the controller in a spot that is easily accessible/within reach. I didn't want to stick it just anywhere but wanted to integrate it into the interior and make it look somewhat OEM. Checked this spot, removed the side panel and checked behind it and thought this spot would be perfect. Took me a few days to cut/trim/perfect the piece since I only get one chance at it.
Installing the motors on the rear - Remove the top mounting hat, using the supplied tool remove the damping knob, using the right size allen key (can't think of size off the top of my head but i think 3mm) and pull out the allen key bolt that is inside the shaft. Apply some grease and reinsert it flush. Then reinstall the top hat without the adjusting knob. Tighten it down, and then apply some of the green locktight and start screwing down the motor.
As you tighten it you will get some restriction when that happens take a small flat screwdriver and turn the top of the motor to the right like 2 full turns, that will rotate the allen bolt down the middle shaft and then you continue tightening the motor down. As it gets tight again repeat the process of turning the top piece 2 turns. Keep going until motor is firmly down and you can go all the way up and down with the flat screw driver. Once done put the rubber boot over the motor and run the wire out.
The controller has 2 sets of wires, one set for the front shocks and one set for the rear shocks. The front you can run through the grommet near the steering coloumn which is not a problem. However the rear there is NO access to the passenger side wheel well to run a wire through. When i looked at the DRIVER side there was the harness going out through a grommet to the fuel door. So I used that access. I had a few rubber gromets laying around similar to the one on the driver side so I drilled a hole, primered it and ran the wire out that way so it is even on both sides.
Front coil installed
Front motor install:
So I mentioned earlier on the parts list TEIN has 2 sets of motors EDK05-M12120 and EDK05-M12140
The difference is M12120 = 4x M12 fitting size motors, and the M12140 = 2x M12 and 2x M14 size motors.
I initially got the M12140 kit not knowing it was the incorrect kit at the time because everything mounted correctly. Rear coils used M12 size motors and no problem. Fronts Mounted with M14 Motors no problem. Thought I was done so hooked up all the wiring and drove it home, everything worked great until the controller started throwing an ERROR code with the front harness.
Immediately pulled over and inspected and found the wiring had twisted around the motor/shock shaft at the top and the connector popped off the harness. So talking with Tein we found that I had the incorrect motor set.
Funny thing one of my friends had ordered the same setup for his EVO and he ended up receiving the INCORRECT motors! He needed the M12140 which I had and I needed the M12120 which he had.
So I took 2 of his M12 motors and gave him my 2 M14 motors. The extension kit converts the M12 to M14 which mounts to the top of the coil so the Motor gets moved aside. This will allow the shaft to rotate and won't cause the Motor/Harness to bind!
So install is now complete and all working how it should! Also, no ADS light due to the ADS Cancellors which come standard with the coils and don't have to buy it separately!
Also the @Vincent@27WON the strut bar is a perfect place to mount the motors
Any questions feel free to ask! I'll gladly answer to my best ability.
PS: The Damping controller is UNIVERSAL so even non Si vehicles can get full damping adjustment
Last edited:
Fit2Hatch
Senior Member
- First Name
- Victor
- Joined
- Nov 12, 2018
- Threads
- 4
- Messages
- 255
- Reaction score
- 151
- Location
- Waipahu
- Vehicle(s)
- '18 Hatchback Sport
Enjoy following your built progress very much.
Since you have used both the Type R and Whiteline RSB, I would like to hear your opinion regarding the two.
TIA
Since you have used both the Type R and Whiteline RSB, I would like to hear your opinion regarding the two.
TIA
OP
OP
Thusee
Senior Member
- First Name
- Thusee
- Joined
- Jul 20, 2018
- Threads
- 1
- Messages
- 521
- Reaction score
- 1,148
- Location
- Markham
- Vehicle(s)
- 2018 civic si sedan
- Vehicle Showcase
- 1
- Thread starter
- #103
The Si comes with a 18mm rsb, the Type R bar is 20mm and the whiteline that I have is 22mm. When I switched out to the 20mm rsb i immediately noticed a change in the way the car corners, definitely felt tighter. Over time I started getting used to it so figured lets upgrade. So went with the 22mm, and of course that made it even tighter and i loved it personally.Enjoy following your built progress very much.
Since you have used both the Type R and Whiteline RSB, I would like to hear your opinion regarding the two.
TIA
If you plan on upgrading the rsb you should do it in stages from your username it makes me think you have a hatch which has a 16mm rsb. So either an Si (18mm) or Type R (20mm) bar would be a great upgrade for you to begin with, if the rsb is way too stiff for your style of driving you can spin out the back end going around a corner, you would want a little flex.
You can find Si or Type R bars everywhere for cheap as they upgrade to thicker ones. With the Type R bar you will need the type r brackets as well. I think the Si bar you can get away with your existing brackets if not you will need those brackets as well.
In my opinion for a Daily a Type R bar is more than enough. Hope this helps.
Fit2Hatch
Senior Member
- First Name
- Victor
- Joined
- Nov 12, 2018
- Threads
- 4
- Messages
- 255
- Reaction score
- 151
- Location
- Waipahu
- Vehicle(s)
- '18 Hatchback Sport
Your detailed explanation helped a lot, thank you!The Si comes with a 18mm rsb, the Type R bar is 20mm and the whiteline that I have is 22mm. When I switched out to the 20mm rsb i immediately noticed a change in the way the car corners, definitely felt tighter. Over time I started getting used to it so figured lets upgrade. So went with the 22mm, and of course that made it even tighter and i loved it personally.
If you plan on upgrading the rsb you should do it in stages from your username it makes me think you have a hatch which has a 16mm rsb. So either an Si (18mm) or Type R (20mm) bar would be a great upgrade for you to begin with, if the rsb is way too stiff for your style of driving you can spin out the back end going around a corner, you would want a little flex.
You can find Si or Type R bars everywhere for cheap as they upgrade to thicker ones. With the Type R bar you will need the type r brackets as well. I think the Si bar you can get away with your existing brackets if not you will need those brackets as well.
In my opinion for a Daily a Type R bar is more than enough. Hope this helps.
I do have a hatch and already have an Si bar. Which is still a little tame so was thinking gonna get the Type R.
I was also wanting to know, since you have first hand experience with the Type R, and Whiteline. How it would compare, between the Type R and Whiteline's soft and firmer setting.
Thanks again for your insight!
Sponsored
Similar threads

- Replies
- 11
- Views
- 1,091