Type R OEM auto dim mirror

sofaking

Senior Member
Joined
Sep 4, 2017
Threads
2
Messages
66
Reaction score
72
Location
LA
Vehicle(s)
FK8 #46818// JDM AF Z33
Country flag
Necessary creature comfort. Heres a few extra helpful hints to ease the install.

Parts - Mirror + Civic harness

https://www.hondapartsnow.com/genuine/honda~mir~as~rr~view~auto~76400-sza-a22.html


https://www.hondapartsnow.com/genuine/honda~auto~mirror~att~08v03-tba-100.html


Guide
http://www.collegehillshonda.com/instructions/civic/2017/4dr/daynightmirror.pdf

Obviously, the USDM Type R's done have CMBS so you can omit those steps.

I also didnt take down the map lights/sun visors as there was enough 'play' in the headlinder for me to pull, and route the wire up there.

Step 19 was the 'most difficult' as the diagram shows you removing the ground bolt..but once you actually take a look you realize its humanly impossible to get there.


Honda Civic 10th gen Type R OEM auto dim mirror 12B2E174-2D93-4A83-BAAF-692CED95024A


View attachment 81502

Remove these 2 screws because the ground bolt is directly behind this fuse box.

Honda Civic 10th gen Type R OEM auto dim mirror 1704165B-5C14-423E-A715-4780319BF200


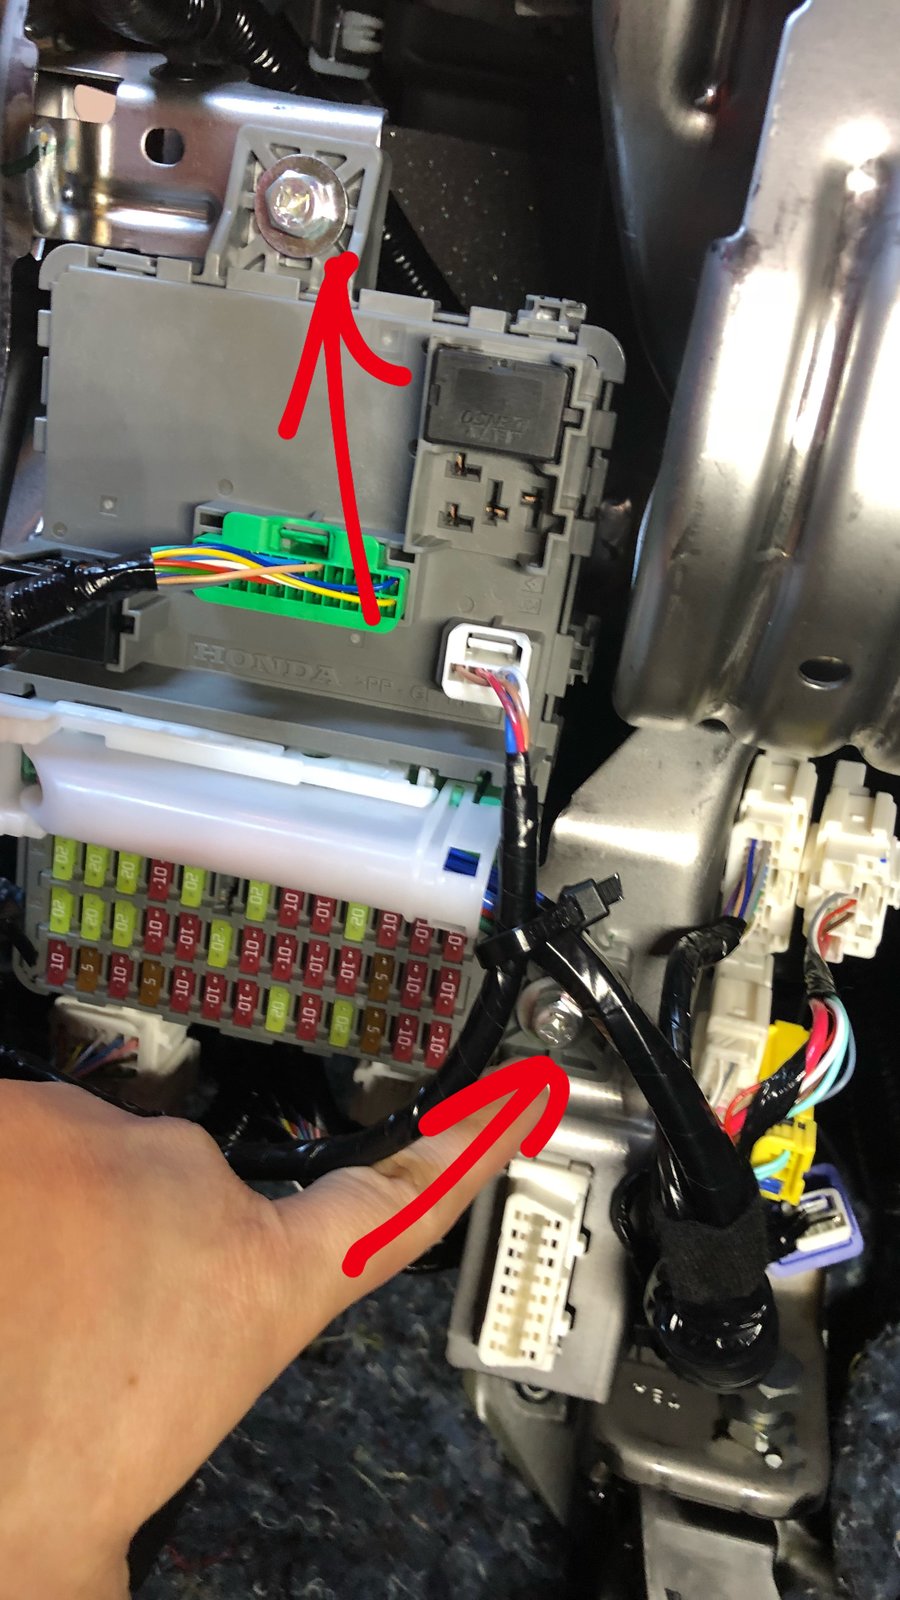
Unclip this part to allow that wire loom to hang low with the fuse box.

Honda Civic 10th gen Type R OEM auto dim mirror 65E028A6-9498-49DE-9981-E600F16DF6D6


Gently pull the fuse box toward the floorboard. This will give you some room to access the grounding bolt.


Honda Civic 10th gen Type R OEM auto dim mirror 12980010-E736-4D2C-B970-00CECCADE95B
 

Attachments

  • 0 bytes Views: 0
Last edited:
OP
OP
sofaking

sofaking

Senior Member
Joined
Sep 4, 2017
Threads
2
Messages
66
Reaction score
72
Location
LA
Vehicle(s)
FK8 #46818// JDM AF Z33
Country flag
Honda Civic 10th gen Type R OEM auto dim mirror A1469814-6E9C-4A8E-8B7B-F3CA7E39587D


Here is the grounding bolt (10mm) ...even with the fuse box sort of out of the way, its still difficult to get to.

Honda Civic 10th gen Type R OEM auto dim mirror 8E5A7295-809E-43C8-92E1-AE02EF2B675F


route the wiring harness like so, up toward the A pillar.

Honda Civic 10th gen Type R OEM auto dim mirror AA351F70-422D-4088-A0F4-B754D3589781


Since the Type R doesnt have any accessories, this is a simple step. Just plug it in here.
 
Last edited:
OP
OP
sofaking

sofaking

Senior Member
Joined
Sep 4, 2017
Threads
2
Messages
66
Reaction score
72
Location
LA
Vehicle(s)
FK8 #46818// JDM AF Z33
Country flag
There are no lights or really any sort of indicator letting you know you’ve hooked everything up properly. I started the car, backed out of the garage and noticed it working.

Honda Civic 10th gen Type R OEM auto dim mirror 882D3512-0F34-43FC-A71B-F9D73A3E9D1F


baldheadracing

Senior Member
First Name
Craig
Joined
Jan 4, 2017
Threads
44
Messages
1,248
Reaction score
1,382
Location
Canada's capital
Vehicle(s)
FK8
Country flag
I just used a different grounding point. The studs holding the bracket for the hood release cable are easily accessible, and then one doesn't have to move the fuse box.

Good plan avoiding removing the headrest. I found it a pain to re-install.
 

atombomb33

Member
Joined
Aug 14, 2016
Threads
9
Messages
29
Reaction score
10
Location
Los Angeles
Vehicle(s)
2017 Civic Type R #341
Great write up and pics. I just used the same instructions for the OEM mirror, but installed a Gentex Homelink mirror. It was pretty easy to do.
 

Mick the Quick

Senior Member
First Name
Mick
Joined
Feb 25, 2016
Threads
24
Messages
890
Reaction score
686
Location
Southeast MA
Vehicle(s)
2018 PMM Civic Type R (R-08508)
Country flag
Great write up and pics. I just used the same instructions for the OEM mirror, but installed a Gentex Homelink mirror. It was pretty easy to do.
Yup, if you don't already have Homelink, it might make sense to get a used Gentex autodim mirror with Homelink. That's what I did -- if you don't need or want compass, you can buy the 313 model for less than $25 shipped on eBay. The compassed model is about $40-50 shipped.
 
OP
OP
sofaking

sofaking

Senior Member
Joined
Sep 4, 2017
Threads
2
Messages
66
Reaction score
72
Location
LA
Vehicle(s)
FK8 #46818// JDM AF Z33
Country flag
Yup, if you don't already have Homelink, it might make sense to get a used Gentex autodim mirror with Homelink. That's what I did -- if you don't need or want compass, you can buy the 313 model for less than $25 shipped on eBay. The compassed model is about $40-50 shipped.

I used the Homelink out of an accord/odyssey.

Sucks we have to find all these different methods to put these small conviences back in.
 

wewong

Senior Member
First Name
Eric
Joined
Oct 10, 2017
Threads
0
Messages
81
Reaction score
62
Location
Vancouver, BC
Vehicle(s)
2021 CTR LE
Country flag
I haven’t installed my mirror yet, but I got annoyed by the quality of the wiring harness, so I’ve decided to replace the electrical tape with heat-shrink tubing at the exposed section of the harness (where it plugs into the mirror). Below are the before and after pictures.

Honda Civic 10th gen Type R OEM auto dim mirror BFC9E7C7-20CB-4656-A836-90448F1F40EF


Honda Civic 10th gen Type R OEM auto dim mirror 0D36BF2C-F845-4570-9AA9-F121EFD69E16


stevescivic

Senior Member
Joined
Oct 6, 2017
Threads
38
Messages
345
Reaction score
185
Location
Canada
Vehicle(s)
2017 Civic Type-R, 1990 CRX Si
Country flag
I haven’t installed my mirror yet, but I got annoyed by the quality of the wiring harness, so I’ve decided to replace the electrical tape with heat-shrink tubing at the exposed section of the harness (where it plugs into the mirror). Below are the before and after pictures.

BFC9E7C7-20CB-4656-A836-90448F1F40EF.jpeg


0D36BF2C-F845-4570-9AA9-F121EFD69E16.jpeg
There are no lights at all with this mirror? I just installed mine (the sun visor was a pain to remove and even more confusing to reinstall). I thought my wiring was no good or something because of no light and it didn’t seem to take the glare away from cars behind me. Who knows. Maybe it is working and I just don’t know it.
 

garoto

Senior Member
Joined
Apr 23, 2018
Threads
30
Messages
647
Reaction score
343
Location
San Francisco, CA
Vehicle(s)
05 RYP S2K, 18 CW CTR
Country flag
I always enjoy how these installation instructions start simple. Then on step 1,256 it says, unbolt engine mounts and remove engine. Proceed to installing the rearview mirror after installing the gas tank.
 

stevescivic

Senior Member
Joined
Oct 6, 2017
Threads
38
Messages
345
Reaction score
185
Location
Canada
Vehicle(s)
2017 Civic Type-R, 1990 CRX Si
Country flag
I always enjoy how these installation instructions start simple. Then on step 1,256 it says, unbolt engine mounts and remove engine. Proceed to installing the rearview mirror after installing the gas tank.
oh man tell me about it!

The thing that peed me off MOST about the mirror installation was the sun visor removal and re-installation. The removal part took me a bit to figure out b/c the slot in which the screwdriver is supposed to go in can actually continue turning "into" the mount at which point it then releases. Putting the damn thing back in took me over 1 hour and like 8 tries to figure out WTF I was doing wrong. Turns out I didn't quite have the white portion of the visor that locks into the roof turned enough to clear the weird cutout in the ceiling. Not rocket science but I was tired, cold, hangry and flustered from the lack of descriptive on how to get the thing out and back in. Lastly the routing of the wiring although shown in the pictures isn't detailed enough to show if it should be routed behind or in front of the dashboard's steel crossmember. Again some of these minor details would've saved me a bunch of heartache b/c I'm never quite 100% certain how things ought to be routed.

That being said I did confirm last night that the mirror is working by simply shining my smartphone light onto the mirror and paying attention to the background behind me going light and dark. Oddly on my late night cruise I felt as if the mirror wasn't working b/c the headlights behind me seemed glaringly bright even though my back windows are tinted.

Will post a YouTube video soon showing my install.
 

wewong

Senior Member
First Name
Eric
Joined
Oct 10, 2017
Threads
0
Messages
81
Reaction score
62
Location
Vancouver, BC
Vehicle(s)
2021 CTR LE
Country flag
I actually follow OP’s advice and didn’t remove the sun visor. There was just enough slack in the headliner that I tucked the wire underneath without needing to remove the visor. I did however removed the map light and the clips for the left and right visors so that I can pull down the middle portion to attach the foam tape.

On a separate note, I actually haven’t had a chance to drive in the dark, so I didn’t test out the effectiveness of the mirror.
 
OP
OP
sofaking

sofaking

Senior Member
Joined
Sep 4, 2017
Threads
2
Messages
66
Reaction score
72
Location
LA
Vehicle(s)
FK8 #46818// JDM AF Z33
Country flag
oh man tell me about it!

The thing that peed me off MOST about the mirror installation was the sun visor removal and re-installation. The removal part took me a bit to figure out b/c the slot in which the screwdriver is supposed to go in can actually continue turning "into" the mount at which point it then releases. Putting the damn thing back in took me over 1 hour and like 8 tries to figure out WTF I was doing wrong. Turns out I didn't quite have the white portion of the visor that locks into the roof turned enough to clear the weird cutout in the ceiling. Not rocket science but I was tired, cold, hangry and flustered from the lack of descriptive on how to get the thing out and back in. Lastly the routing of the wiring although shown in the pictures isn't detailed enough to show if it should be routed behind or in front of the dashboard's steel crossmember. Again some of these minor details would've saved me a bunch of heartache b/c I'm never quite 100% certain how things ought to be routed.

That being said I did confirm last night that the mirror is working by simply shining my smartphone light onto the mirror and paying attention to the background behind me going light and dark. Oddly on my late night cruise I felt as if the mirror wasn't working b/c the headlights behind me seemed glaringly bright even though my back windows are tinted.

Will post a YouTube video soon showing my install.

You made this harder than it needed to be.

You don’t have to take the visor off or mess with the headliner.

Unless you anticipate any sort of rubbing or interference with the loom of cables I see no need to run it behind the dash’s crissmember.


Cover the sensor on the front of the mirror with tape, shine a light on the mirror side, see if the mirror turns blue or darker...that’ll tell you if it’s working.
Sponsored


Top