SilverXHatch
Member
Can you send a link to that steering wheel?? I'd love that with some blue stitching!
Sponsored
dude that wheel is like a foot bigger than the civics lolThe 2018 Odyssey has a really nice new 4-spoke steering wheel that looks like it could be similar enough for a swap?
Thoughts? The might be ever-so-slightly different.

Great write up. Just installed mine and everything worked well. A note for Canadian LX owners however. My car initially wouldnt start after completing the install due to the anti-theft system. I was saved by page 26 of the owners manual. After disconnecting the battery, Canadian LX owners have to step on the brake when turning the key to get the car to start.I'll edit this post as I have time. For now here is a rough break down. I had a very detailed DIY for it but this site shut down for 5 hours over night. Even though I saved a draft after each step, half the post was missing when the site came back up this morning.
Parts needed or recommended..they use a non-hardening loctite so reusing is up to you.
Two bolts for airbag 90134-S6A-A80
One steering wheel bolt 90161-TX4-000
Tools needed:
10mm open wrench(battery)
Phillips Head(fasteners under airbag)
Torx T30(air bag fasteners)
10mm hex bit(steering wheel mounting bolt)
Whichever tool(s) you decide to use for removing the steering wheel bolt.
Time: 45 minutes - 1 hour max
First use the 10mm wrench to disconnect your battery. You're dealing with the airbag so let it sit for 10-15 minutes just to be safe.
Next you'll remove the two T30 fasteners. These hold your airbag in place.They are located inside the holes at the 3 and 9 o'clock position of the steering wheel cover. I would recommend using a magnetized torx bit.
The airbag will now slide forward. It will be connected to three wires so pull slowly. Thankfully there's quite a bit of play in the wires. You should see the two main airbag connectors. One green and one gray. The third wire(black) is for your horn. I removed this first. Then both airbag connectors.
Here is a picture of the two connectors. At the top of each connector you'll see a small "band" of white. These are the retaining tabs. Pull back horizontally on the white tabs and each connector will slide off horizontally. Once all three wires are off set the airbag down(horn-pad side up!) on the ground and out of the way. I placed some electrical tape over each connector just to be safe. You'll see in the upper part of the picture a white 20 pin connector with a black and red wire entering it. Disconnect this as its attached to the clock spring.

Next is the fun part. Getting the steering wheel bolt off. Honda used to use a nut. Very simple to get off. Recently they've been switching to these bolts. Not as easy.

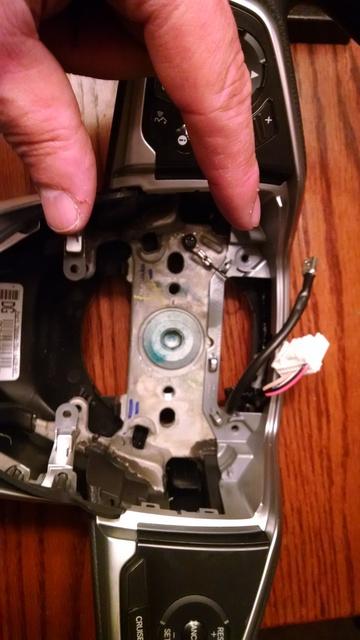
I used a 10mm hex bit on my 1/2" impact gun. Popped it off quickly. Not sure this could be done without at least a breaker bar. Maybe I'm just old but that sucker was on there. A positive is that once the bolt is removed the steering wheel simply falls off...as in literally fell on my lap! No steering wheel puller needed. You can see to the left of the steering column(9 o'clock) a small white circle. That's a small "pilot" post for putting the wheel back on in the correct position. No need to try centering the wheel back on going spline by spline. The wheel can only go back on in that position. Also means little to worry about with the clock spring. It's also nice you don't have to remove the large cover surrounding the signal/wiper stalks.

You're pretty much out of the woods once you get that bolt off. All that's left is transfering the stuff to the new steering wheel. Start by removing the four fasteners holding the two silver trim pieces on. Two on each side.
Next remove the fastener securing the ground.

You'll then remove the back cover of the steering wheel. There are two large black tabs insde the wheel. Press in on these while pulling on the cover. It will slide off but will still be connected because of the wiring to the controls.

With the cover loose you can undo both control connectors. There will be one blue and one white. Side shot of blue connector still attached.

Rear cover removed. You can see the wire for the horn and 20 pin connector you removed from the clock spring earlier.

Now you'll remove the silver trim and controls. Go slow and steady. There are no fasteners here. Everything you remove from now on has plastic posts or tabs. Start with the lower piece of silver trim. Pull up on the thinner "upper" parts.

Work your way down around the bottom. I know I said slow and steady but you will have to use some force. The posts are in the wheel pretty snug.

Image of bottom piece removed showing post locations.

Next you'll remove the upper trim. It's one piece going from control to control. It has some flex so you can do one side at a time. Just be careful as it's an expensive part. Start by lifting the two tabs on the inner side of the control unit.

Work your fingers under the trim in this location and lift up and towards the center of the steering wheel.

Picture of upper trim removed.

The only things left to remove are the two control units. The pins on these are angled inwards toward the center of the wheel. Start by unclipping this post located on the rear of the wheel.

Next work your fingers under the part of the unit in the same spot where you started the upper silver trim. Like the trim lift up while pulling in towards the center of the wheel. Then rock the part back and forth while lifting up. When the posts get far enough out you'll pull the unit out toward the wheel grip. These guys are in there snug! You can see the angle of the posts and holes.

Everything off the wheel.
Parts transferred to the new wheel.

What website did you use to order the parts? I checked hondapartsunlimited.com but wasn't able to find the shift nob or steering wheelI'm thankful Honda offers the EX-T. I realize I'm in the minority but I prefer heated cloth seats. I also prefer a leather steering wheel/shift knob and auto dimming mirror. Paying the $1500 premium for the EX-L to gain those items wasn't worth it for me. Could care less about a power seat. After some searching I've found you can sort of build your Civic with two of the four EX-L only items, for what I consider a reasonable price.
I'm not sure if it's a glitch in the system or because the Civic is so new but the leather steering wheel is currently listed at the same price as the vinyl one. I paid $87 for mine. Added the shift knob for another $48. Shipped it was $160 for both. I then ordered the auto dimming mirror and mounting kit for $140 shipped. So $300 total. What's nice is that you can a la carte these however you like.
The mirror can be ordered from any place selling the accessories.
Part Numbers:
Steering Wheel 78501-TBA-A21ZA
Shift Knob 54130-TBA-L82ZA


I usually just order stuff from my dealer. Same prices as online, and usually only one day or so to get stuff in they don't have right there.What website did you use to order the parts? I checked hondapartsunlimited.com but wasn't able to find the shift nob or steering wheel
Do you by chance know the part number for the shift knob and leather wheel?I usually just order stuff from my dealer. Same prices as online, and usually only one day or so to get stuff in they don't have right there.
Not off hand, but there are plenty of sites online that let you search up parts for Civics. I usually use http://torontohondaparts.com/Do you by chance know the part number for the shift knob and leather wheel?