simply_the_best
Senior Member
- First Name
- Chris
- Joined
- Aug 28, 2017
- Threads
- 13
- Messages
- 158
- Reaction score
- 157
- Location
- Westchester County, NY
- Vehicle(s)
- 2017 Civic Si (FC1), 1999 Toyota Corolla
- Vehicle Showcase
- 1
- Thread starter
- #1
So for those of you that have asked and did searching like I did and could not find a way to keep the fogs on with high beams here is your answer. After numerous people saying that it will not work due to our vehicles having a BCM (Body Control Module) which control our lighting and other things that operate in side and outside the vehicle. I looked the wiring diagram for my vehicle 2017 Civic Si sedan (FC1) which this should be the same for most other 10th gen Civic models. **QUESTIONS FEEL FREE TO ASK MESSAGE ME ON CIVICX OR FOR A FASTER REPLY MESSAGE ME ON MY INSTAGRAM: @simply_the_best **
DISCLAMER: I AM IN NO WAY RESPONSIBLE FOR YOU BURNING YOUR CAR DOWN IF YOU CANNOT SOLDER OR NOT GOOD WITH ELECTRICAL WORK, FOR TICKETS YOU MAY RECEIVE, OR INSPECTIONS YOUR CAR MAY FAIL. THIS IS AT YOUR OWN RISK.

Now lets get into this. This is somewhat a simple installation bumper removal is not needed.
Tools:
- 1/4" or 3/8" ratchet
- 10mm socket
- 1/4" or 3/8" 3" extension
- Needle nose pliers
- Wire stripper pliers
- Diagonal cutting (dyke) pliers
- Solder
- Heat gun / small torch / soldering iron
Hardware:
- RL44 universal relay (auto parts store; picture below)
- 22-16 AWG weatherproof fully insulated .250" female disconnects (auto parts store; picture below)
- 18 AWG automotive wiring (auto parts store; picture below) **color doesn't matter I chose black so its less noticeable**
- 3M Super 33+ or Super 88 (88 is better quality) electrical tape
- 3/8" protective wire wrap aka wire loom/sheathing (Harbor Freight; fairly cheap)
- Eaton Bussman add-a-circuit fuse tap (auto parts store; picture below)
- 1 x 10A(red) micro fuse


This is the wire diagram I drew out for how the fog lamps will be wired (sorry for the sloppy writing tried to be as neat as possible); this is a simple diagram I tried to keep it simple for everyone:
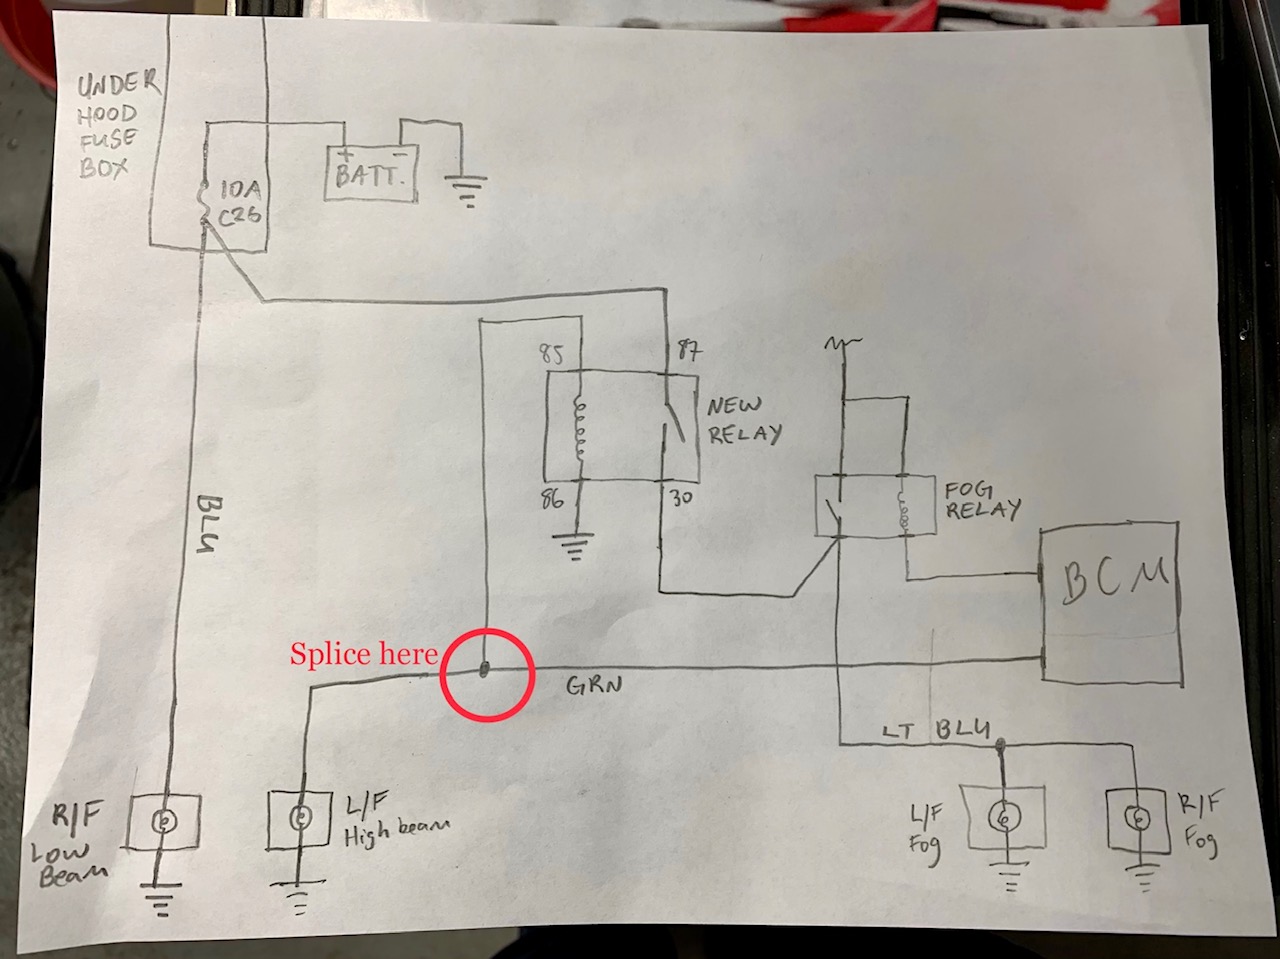
***THE NUMBERS NEXT TO THE RELAY IN THE CENTER IS HOW THE WIRES WILL RUN INTO THE RELAY.***
**AS SHOWN BELOW** **REFER BACK IF NEEDED**


>Start by tapping into L/F High beam circuit (GREEN WIRE) near the high beam bulb connector. Remove electrical tape and wire loom to expose the green wire.***THE WIRE IS VERY SMALL BE CAREFUL NOT TO CUT/BREAK THE WIRE!*** CAREFULLY shave away some of the green wire sheathing to expose the strands and solder a new piece of wire to that one. When finished it should look like this:
(DON'T MIND THE RED WIRE, I CHANGED IT TO BLACK)

>Tape it up to protect it

>Run roughly about 2' (may need to be trimmed down for proper length) of wire and cut it and install the female disconnect to the other end. Crimp and heat to shrink the heat shrink end and attach at pin #85 of the relay.
>Cut another 1-2' (may need to be trimmed down for proper length) section of wire to attach to the battery ground bolt (10mm) above under-hood fuse box, and install another female disconnect to it and attach to pin #86 of the relay. ***WHEN YOU UNBOLT THE 10MM GROUND YOUR CAR IS GOING TO LOSE ITS MEMORY AND WILL NEED TO BE DRIVEN TO CLEAR THE LIGHTS FOR THE VSA SYSTEM AND I/M READINESS MONITORS FOR INSPECTION, MAY ALSO DRIVE A LITTLE FUNKY UNTIL IT LEARNS IDLE AND DRIVING*** (DON'T MIND THE RED WIRE I SWITCHED TO BLACK)


>At this point you can pull on the high beams and listen to make sure the relay is clicking correctly which means so far its wired correctly.
>Next, remove the fog lamp relay shown below:

>Take some wire and strip one end and carefully slide into the middle position on the fog lamp relay which was just removed. Should look like below:


>Run that wire to pin #30 of the new relay. Be sure to attach a female disconnect to it before attaching it.
>Remove fuse C29 from the fuse box which is shown in the image below. (This is where the fog lamps will be getting their power from to power them when the high beams are turned on.)

>Install the add-a-fuse piece with the new 10A fuse to that location. This is the correct way to install it because this will protect the system with a fuse just like everything else inside of the vehicle's fuse box. Image shown below:

>The wire coming off of the add-a-fuse you will have to extend which I cut off the blue crimp that came on and soldered a new piece of wire, which then runs to pin #87 of the new relay with a female disconnect installed.
>At this point make sure all wiring is attached to the relay correctly and you should be able to put on your high beams and your fogs will stay on as promised. The BCM doesn't know that the fog lamps are operating with the high beams so there will be no codes. The only down side to this is the high beams will now operate with the fog lamps all the time meaning when you do flash to pass (pull on the lever) the fogs turn on with the high beams, but the fog lamp switch still operates normally with low beams meaning you can turn them on and off but if they are off and you hit the high beams they will automatically come on.
>You can then notch your fuse box like so with cutting pliers to allow the wire to run out and be able to close the fuse box fully. (DON'T MIND THE RED WIRE I SWITCHED TO BLACK)


>I installed the rest of the wire loom to protect the rest of the wires and zip tied down the new relay to the side of the fuse box to clean it up. Shown below:

>ENJOY!!!
**QUESTIONS FEEL FREE TO ASK MESSAGE ME ON CIVICX OR FOR A FASTER REPLY MESSAGE ME ON MY INSTAGRAM: @simply_the_best **
DISCLAMER: I AM IN NO WAY RESPONSIBLE FOR YOU BURNING YOUR CAR DOWN IF YOU CANNOT SOLDER OR NOT GOOD WITH ELECTRICAL WORK, FOR TICKETS YOU MAY RECEIVE, OR INSPECTIONS YOUR CAR MAY FAIL. THIS IS AT YOUR OWN RISK.
Now lets get into this. This is somewhat a simple installation bumper removal is not needed.
Tools:
- 1/4" or 3/8" ratchet
- 10mm socket
- 1/4" or 3/8" 3" extension
- Needle nose pliers
- Wire stripper pliers
- Diagonal cutting (dyke) pliers
- Solder
- Heat gun / small torch / soldering iron
Hardware:
- RL44 universal relay (auto parts store; picture below)
- 22-16 AWG weatherproof fully insulated .250" female disconnects (auto parts store; picture below)
- 18 AWG automotive wiring (auto parts store; picture below) **color doesn't matter I chose black so its less noticeable**
- 3M Super 33+ or Super 88 (88 is better quality) electrical tape
- 3/8" protective wire wrap aka wire loom/sheathing (Harbor Freight; fairly cheap)
- Eaton Bussman add-a-circuit fuse tap (auto parts store; picture below)
- 1 x 10A(red) micro fuse
This is the wire diagram I drew out for how the fog lamps will be wired (sorry for the sloppy writing tried to be as neat as possible); this is a simple diagram I tried to keep it simple for everyone:
***THE NUMBERS NEXT TO THE RELAY IN THE CENTER IS HOW THE WIRES WILL RUN INTO THE RELAY.***
**AS SHOWN BELOW** **REFER BACK IF NEEDED**
>Start by tapping into L/F High beam circuit (GREEN WIRE) near the high beam bulb connector. Remove electrical tape and wire loom to expose the green wire.***THE WIRE IS VERY SMALL BE CAREFUL NOT TO CUT/BREAK THE WIRE!*** CAREFULLY shave away some of the green wire sheathing to expose the strands and solder a new piece of wire to that one. When finished it should look like this:
(DON'T MIND THE RED WIRE, I CHANGED IT TO BLACK)
>Tape it up to protect it
>Run roughly about 2' (may need to be trimmed down for proper length) of wire and cut it and install the female disconnect to the other end. Crimp and heat to shrink the heat shrink end and attach at pin #85 of the relay.
>Cut another 1-2' (may need to be trimmed down for proper length) section of wire to attach to the battery ground bolt (10mm) above under-hood fuse box, and install another female disconnect to it and attach to pin #86 of the relay. ***WHEN YOU UNBOLT THE 10MM GROUND YOUR CAR IS GOING TO LOSE ITS MEMORY AND WILL NEED TO BE DRIVEN TO CLEAR THE LIGHTS FOR THE VSA SYSTEM AND I/M READINESS MONITORS FOR INSPECTION, MAY ALSO DRIVE A LITTLE FUNKY UNTIL IT LEARNS IDLE AND DRIVING*** (DON'T MIND THE RED WIRE I SWITCHED TO BLACK)
>At this point you can pull on the high beams and listen to make sure the relay is clicking correctly which means so far its wired correctly.
>Next, remove the fog lamp relay shown below:
>Take some wire and strip one end and carefully slide into the middle position on the fog lamp relay which was just removed. Should look like below:
>Run that wire to pin #30 of the new relay. Be sure to attach a female disconnect to it before attaching it.
>Remove fuse C29 from the fuse box which is shown in the image below. (This is where the fog lamps will be getting their power from to power them when the high beams are turned on.)
>Install the add-a-fuse piece with the new 10A fuse to that location. This is the correct way to install it because this will protect the system with a fuse just like everything else inside of the vehicle's fuse box. Image shown below:
>The wire coming off of the add-a-fuse you will have to extend which I cut off the blue crimp that came on and soldered a new piece of wire, which then runs to pin #87 of the new relay with a female disconnect installed.
>At this point make sure all wiring is attached to the relay correctly and you should be able to put on your high beams and your fogs will stay on as promised. The BCM doesn't know that the fog lamps are operating with the high beams so there will be no codes. The only down side to this is the high beams will now operate with the fog lamps all the time meaning when you do flash to pass (pull on the lever) the fogs turn on with the high beams, but the fog lamp switch still operates normally with low beams meaning you can turn them on and off but if they are off and you hit the high beams they will automatically come on.
>You can then notch your fuse box like so with cutting pliers to allow the wire to run out and be able to close the fuse box fully. (DON'T MIND THE RED WIRE I SWITCHED TO BLACK)
>I installed the rest of the wire loom to protect the rest of the wires and zip tied down the new relay to the side of the fuse box to clean it up. Shown below:
>ENJOY!!!
**QUESTIONS FEEL FREE TO ASK MESSAGE ME ON CIVICX OR FOR A FASTER REPLY MESSAGE ME ON MY INSTAGRAM: @simply_the_best **

