Donuyen18
Senior Member
- Joined
- May 22, 2016
- Threads
- 31
- Messages
- 719
- Reaction score
- 583
- Location
- Garden grove
- Vehicle(s)
- Honda s2000
- Thread starter
- #1
This is my walk through for installing the Honda Oem wireless charger on a 2016 sedan CVT.

Other body styles and trims might be different but you can probably still use most of this guide. That being said, check the Manual before attempting this install because different from levels and existing modifications such as the illumination kit will.affect the wiring part of the install. On a scale of 1 to 10 for difficulty, I would only give this about a 2 or 3. I just used the oem instructions and took it step by step. It's a fairly easy install. However, it is a hassle to remove all the panels to get to the install. It feels like Honda is making things more difficult for diyers hoping that we will have the dealership install it for us. This install requires no electrical work unless you count disconnecting and connecting electrical components but there is no need for splicing or wire tapping or crimping.
Tools needed:
10mm socket
Phillips screw driver
Pry tools or flat head screw driver
Car key
Painters tape
Remove the negative terminal from the battery

Pry the lower dash panel and remove. Reach under with your hand and pull forward. Don't yank too hard because there are some connections that will still be attached.

There are 3 connections to remove. The 3rd connector is on the right side. I moved the panel to the back seat.

Remove the driver side armrest. You will need to wedge the prytool in between the armrest and the base to separate them. You can use a flat head but just be careful not to scratch anything.

Place some painters on the infotainment so that you don't scratch it

Remove the driveside console trim piece. This is the same as the armrest. Use the prytool to separate. The trim is a more difficult to remove then the armrest. Don't use too much force because you don't want anything to break but some force will be needed for these parts.

Repeat the process for the passenger side


Remove the climate control. It is held in by clips so use light force to pull it forward. Don't pull too hard as there are connectors attached


Remove the panel on the rear of the console. It is held in by clips. I had to use some force to remove this part. If you have a higher trim that has the rear vents or rear seat warmers, remember to remove those wires as well.

Open up the armrest cover and slide back the drink holder and coin tray to give yourself some room.

On the inside of the console near the front, there's a small runner cover that is shapped like a rectangle. Remove the cover. Grab a car key and insert. This will allow you to move the shifter to neutral. If you have a manual, you only need to remove the shift knob by spinning it.


Remove the trim surrounding the shifter. Start by removing the 2 screws on the sides. Then pull up with light pressure to remove the trim. Again, be careful as there are connectors attached beneath. Detach the connectors.


Remove the original tray. It is held in by clips so just yank it upwards to remove. You can toss the tray.

Pull up on the bezel around the shifter to detach it from the console panel.

Remove the console panel. It is attached by two screws and one bolt. Put the panel to the side.


Remove the rubber tray

Use a prytool or screwdriver and insert it into the small space shown below. This will cause the panel to pop out. Be sure to remove the connectors attached.

Remove the lower tray. Remove the connector near the top.
The instructions say to completely remove the side panels on the center consoles. I was able to just pull back the panel near the front.

They provide urethane tape. Cut the tape in half and apply the correct areas. I was not able to take a photo of this so I'll add the instructions.


Place the fuse label onto the harness

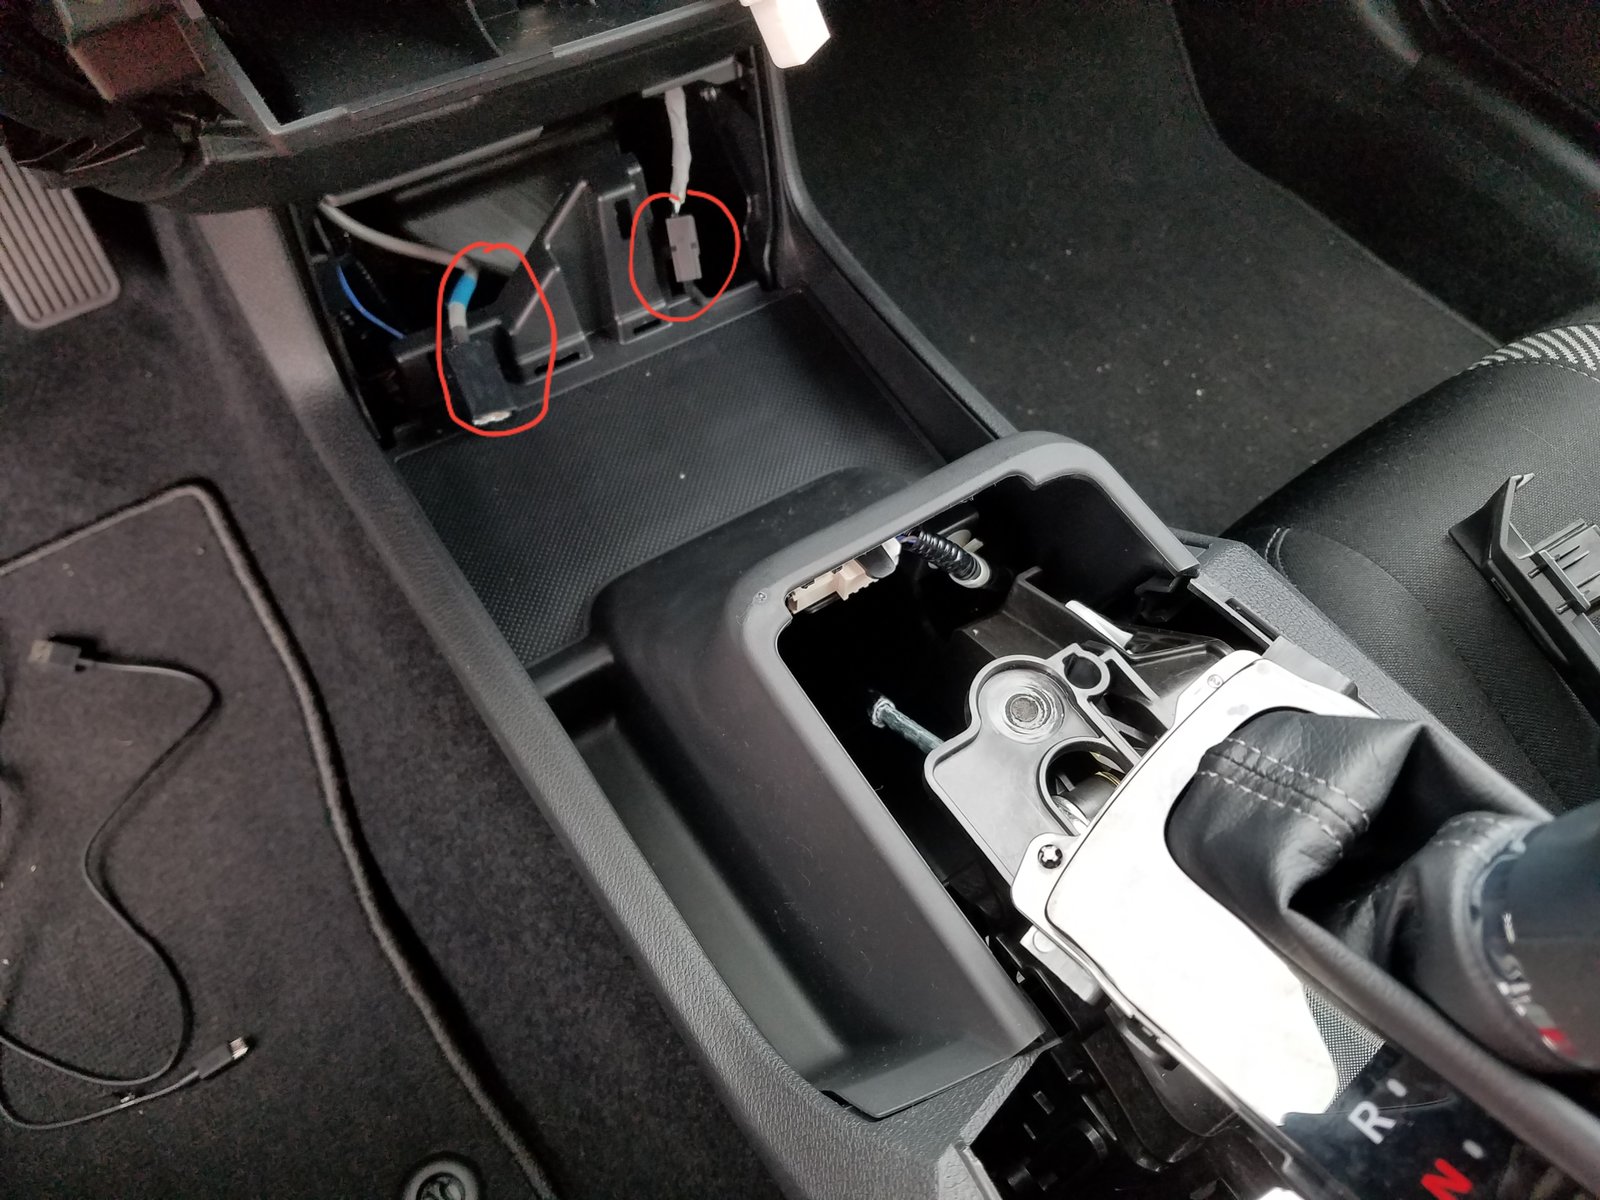
Plug the wire harness into the car.

Attach the wire harness into the small white connector. Attach the additional adapter below that. Please note that this will vary with trims and existing accessories you may have installed. Please refer to the instructions for your particular set up.

Attach the ground wire to the frame. I used a spot that had multiple grounds already attached

Run the wire harness to the center console. I used the instructions for this part.

Reverse the order and install the side panel>lower tray>usb panel cover>rubber mat for lower tray>console panel. Be sure to attach console panel with the two screws and bolt.

Connect the clip from the wire harness to the home in the diagram.

Place the wireless charger unit below the screen where the upper tray use to be. Attach the wire to the unit. Secure the unit with two screws.


Place the new upper tray around the charging unit and press down to pop the clips into place.

Add the supplied 20 amp fuse


Reverse the order to complete the install.
Shifter bezel>shifter trim>shift to park> insert rectangle rubber cover> rear console cover>climate controls>console trim covers>arm rest cover>lower driver panel>hook up negative terminal to battery.
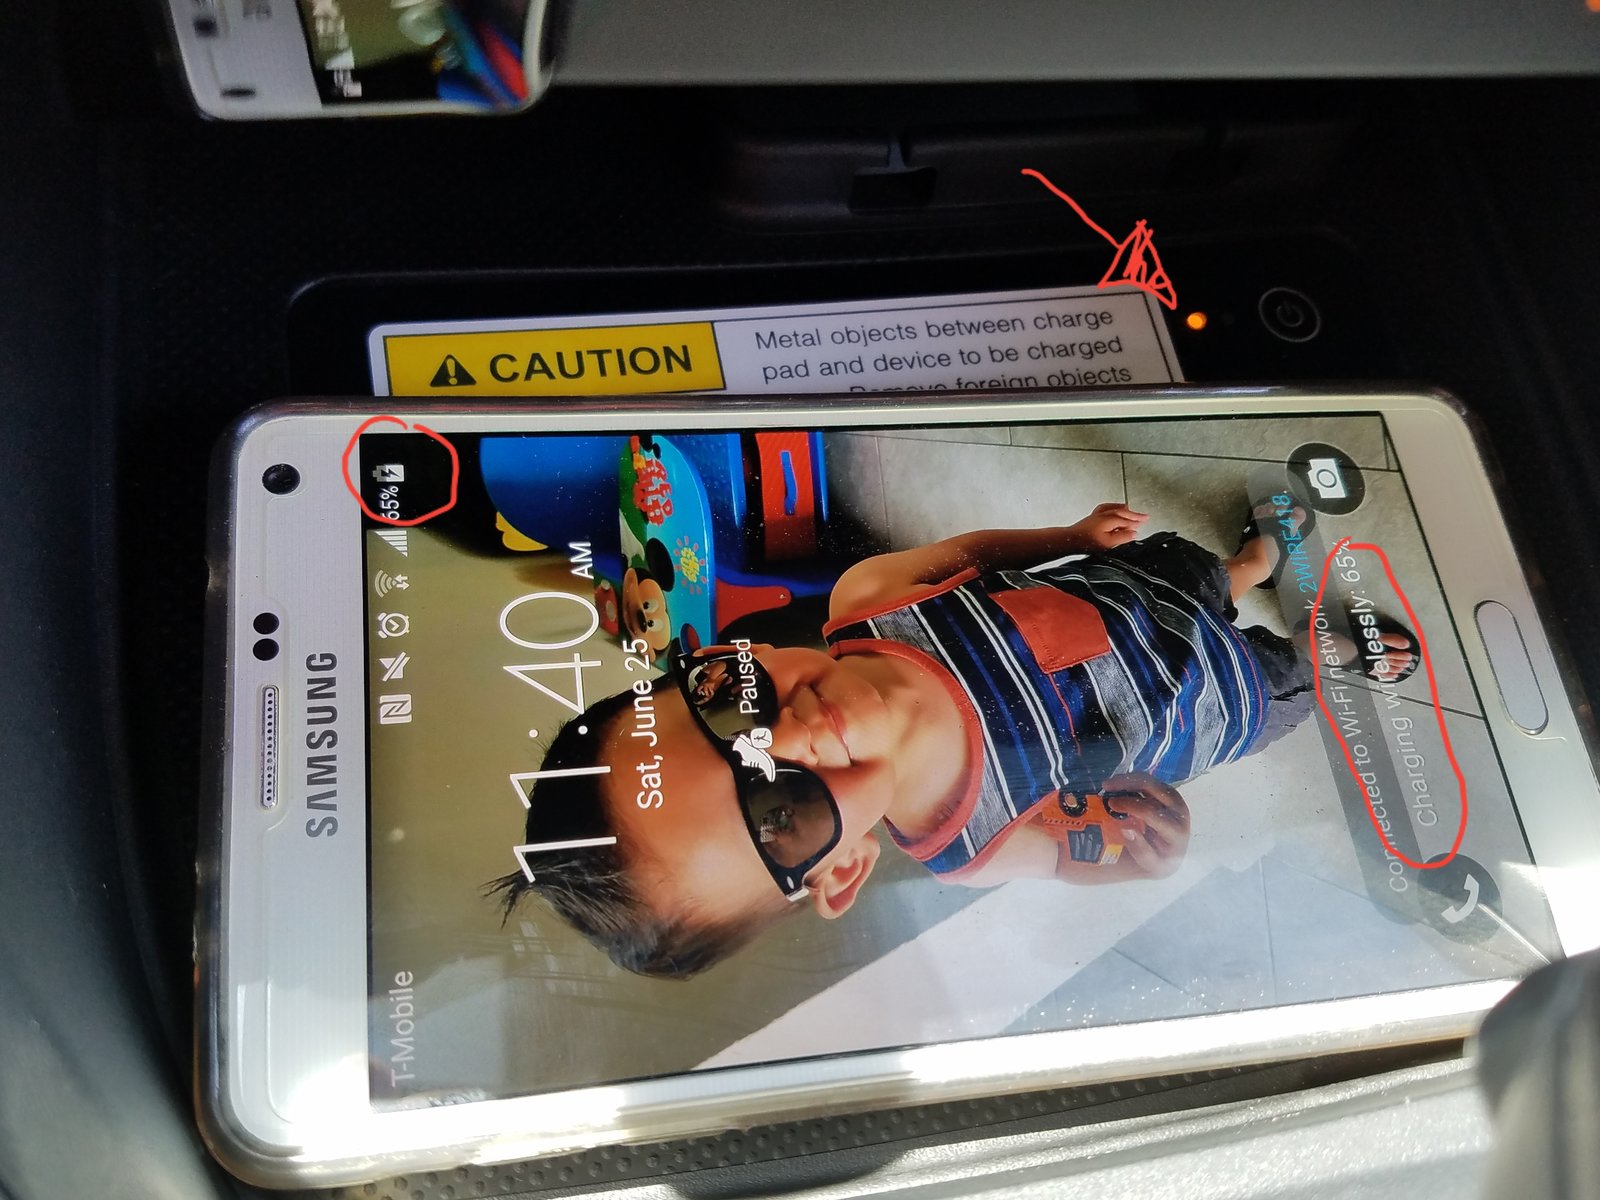
Start your car to test the charger. The light will not be on. Hold the power button until light turns on. When light is green, it is on stand by mode


Place your phone on the charging pad to confirm it's working.
Final thoughts.
This is a very expensive mod and time consuming. This is my wife's car and she really wanted this feature so had the dealer throw it in when I was buying the car. Again, this is not a very difficult mod but it is time consuming. It has a very clean look to it. It also adds an additional charger to your car for a total of 3 chargers.
Other body styles and trims might be different but you can probably still use most of this guide. That being said, check the Manual before attempting this install because different from levels and existing modifications such as the illumination kit will.affect the wiring part of the install. On a scale of 1 to 10 for difficulty, I would only give this about a 2 or 3. I just used the oem instructions and took it step by step. It's a fairly easy install. However, it is a hassle to remove all the panels to get to the install. It feels like Honda is making things more difficult for diyers hoping that we will have the dealership install it for us. This install requires no electrical work unless you count disconnecting and connecting electrical components but there is no need for splicing or wire tapping or crimping.
Tools needed:
10mm socket
Phillips screw driver
Pry tools or flat head screw driver
Car key
Painters tape
Remove the negative terminal from the battery
Pry the lower dash panel and remove. Reach under with your hand and pull forward. Don't yank too hard because there are some connections that will still be attached.
There are 3 connections to remove. The 3rd connector is on the right side. I moved the panel to the back seat.
Remove the driver side armrest. You will need to wedge the prytool in between the armrest and the base to separate them. You can use a flat head but just be careful not to scratch anything.
Place some painters on the infotainment so that you don't scratch it
Remove the driveside console trim piece. This is the same as the armrest. Use the prytool to separate. The trim is a more difficult to remove then the armrest. Don't use too much force because you don't want anything to break but some force will be needed for these parts.
Repeat the process for the passenger side
Remove the climate control. It is held in by clips so use light force to pull it forward. Don't pull too hard as there are connectors attached
Remove the panel on the rear of the console. It is held in by clips. I had to use some force to remove this part. If you have a higher trim that has the rear vents or rear seat warmers, remember to remove those wires as well.
Open up the armrest cover and slide back the drink holder and coin tray to give yourself some room.
On the inside of the console near the front, there's a small runner cover that is shapped like a rectangle. Remove the cover. Grab a car key and insert. This will allow you to move the shifter to neutral. If you have a manual, you only need to remove the shift knob by spinning it.
Remove the trim surrounding the shifter. Start by removing the 2 screws on the sides. Then pull up with light pressure to remove the trim. Again, be careful as there are connectors attached beneath. Detach the connectors.
Remove the original tray. It is held in by clips so just yank it upwards to remove. You can toss the tray.
Pull up on the bezel around the shifter to detach it from the console panel.
Remove the console panel. It is attached by two screws and one bolt. Put the panel to the side.
Remove the rubber tray
Use a prytool or screwdriver and insert it into the small space shown below. This will cause the panel to pop out. Be sure to remove the connectors attached.
Remove the lower tray. Remove the connector near the top.
The instructions say to completely remove the side panels on the center consoles. I was able to just pull back the panel near the front.
They provide urethane tape. Cut the tape in half and apply the correct areas. I was not able to take a photo of this so I'll add the instructions.
Place the fuse label onto the harness
Plug the wire harness into the car.
Attach the wire harness into the small white connector. Attach the additional adapter below that. Please note that this will vary with trims and existing accessories you may have installed. Please refer to the instructions for your particular set up.
Attach the ground wire to the frame. I used a spot that had multiple grounds already attached
Run the wire harness to the center console. I used the instructions for this part.
Reverse the order and install the side panel>lower tray>usb panel cover>rubber mat for lower tray>console panel. Be sure to attach console panel with the two screws and bolt.
Connect the clip from the wire harness to the home in the diagram.
Place the wireless charger unit below the screen where the upper tray use to be. Attach the wire to the unit. Secure the unit with two screws.
Place the new upper tray around the charging unit and press down to pop the clips into place.
Add the supplied 20 amp fuse
Reverse the order to complete the install.
Shifter bezel>shifter trim>shift to park> insert rectangle rubber cover> rear console cover>climate controls>console trim covers>arm rest cover>lower driver panel>hook up negative terminal to battery.
Start your car to test the charger. The light will not be on. Hold the power button until light turns on. When light is green, it is on stand by mode
Place your phone on the charging pad to confirm it's working.
Final thoughts.
This is a very expensive mod and time consuming. This is my wife's car and she really wanted this feature so had the dealer throw it in when I was buying the car. Again, this is not a very difficult mod but it is time consuming. It has a very clean look to it. It also adds an additional charger to your car for a total of 3 chargers.

") A little too intense just for wireless charging. I keep other "crap" in that spot anyways.
A little too intense just for wireless charging. I keep other "crap" in that spot anyways.